
How To Paint Leather, Fake Leather, & Vinyl – No Sanding! Video & Tutorial
- ajsvintagedesigns
- May 15, 2021
- 4 min read
Updated: Sep 14, 2022

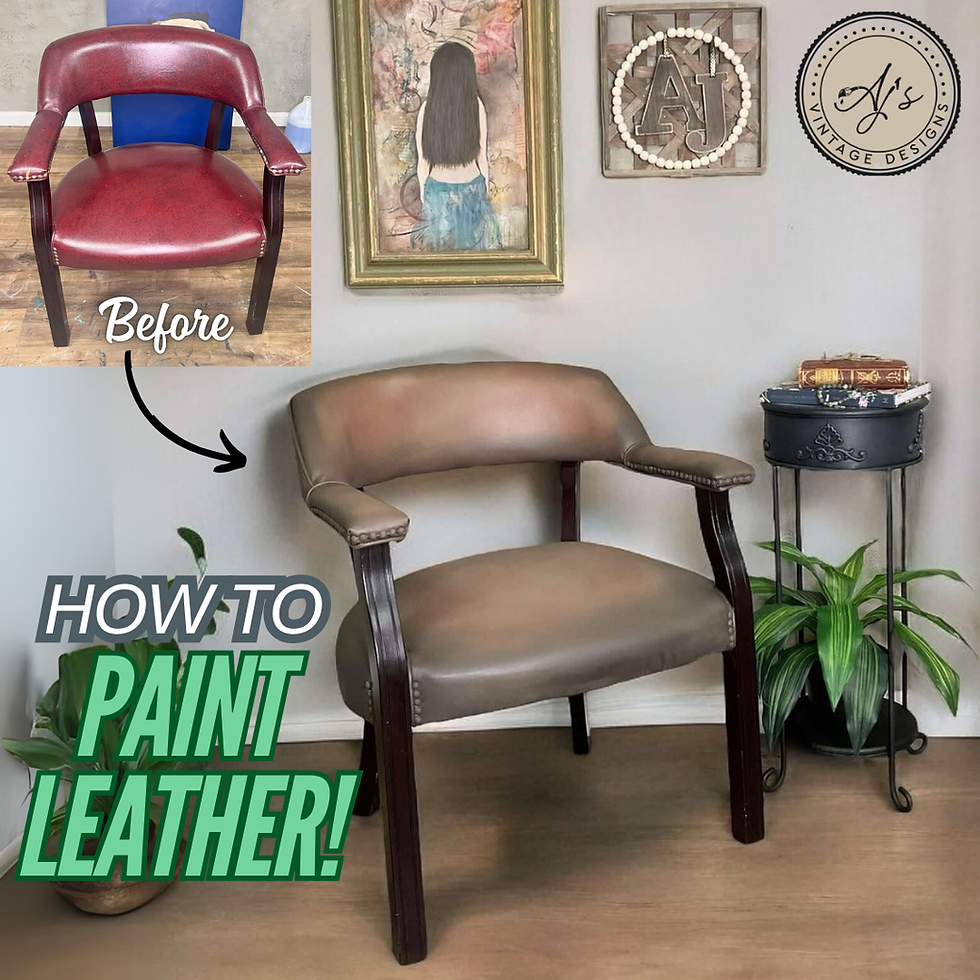
Do you have an old Leather Ottoman, or Fake Leather Chair that needs some TLC? Or maybe a thrift store find you want to flip or customize to match your room?
Instead of paying to have it recovered, you can paint your faux leather, vinyl, or leather chairs (not suede) with NO SANDING between coats.
I’ve done this many times with great results, so I made this tutorial and quick video to follow along, and show you how cool and easy it is to do yourself.

You will see bold colored text in the product list, those are links to each product so that you can locate the products easily if you are wanting to purchase them.
I’m going to refinish my Faux Leather Seat covers on my bar stools using Dixie Belle Paint.
You can easily change the look with one color, using just 2 coats of paint and a sealer. But I want to give them an aged look with a lot of depth, so I’m going to be using 4 colors altogether.
Will it crack and peel? Absolutely not! This paint is very flexible when it dries, and feels exactly like leather or vinyl when it’s done.
These are the products I’ll be using, and will leave a list of links at the end so you can check them out!

Let’s get started!
Since the vinyl was peeling off around the edges, I peeled off any loose pieces that are not securely attached.
Any loose pieces could crack or peel later, so you want to pay attention especially to the edges or piping.
Step #1: Clean Before Painting!
Before you start painting, clean your whole piece of furniture first using a good cleaner.
I use Dixie Belle White Lighting, then wipe it clean with fresh water and a rag to remove any residue.

Step #2: How to use Chalk Mineral Paint on Leather or Vinyl
I will be using Dixie Belle’s Chalk Mineral Paint in Chocolate for the base coat.
Before dipping your brush in the paint, mist your brush with a little water.
I’m using my Dixie Belle Mini Synthetic Brush to get a smooth even finish.
Put on a nice thin coat of Chocolate using long strokes to avoid any start and stop marks.
TIP: If you’re having trouble getting the paint to soak in or spread along the fabric where you peeled off the leather, OR if you have fabric around the edges like I do, spritz water onto the area before painting. This will open up the fibers and allow it to absorb the paint like a dye. Remember, only spray the water onto the fabric, not the leather.
Let it dry for about an hour before you start the second coat.
Step #3 Blending Paint Colors to Look Like Leather
For blending, I’ll be using Dixie Belle’s Pine Cone, Sand Bar, Muscadine Wine & Coffee Bean.
Pour just a small amount of paint onto a plate.
You’ll need 2 small brushes, plus one dry brush for blending.
I used the Dixie Belle Round Brushes for applying the paint, then my trusty Dixie Belle Mini Synthetic for blending.
(Don’t forget your water mister bottle!)

First, mist your piece with just a little bit of water to help with the blending.
Starting with Pine Cone, add little splotches of color in a pouncing motion in random spots. You don’t want to cover up the Chocolate base color completely.
Then using the same technique, I add spots of Sand Bar, Muscadine Wine, then Coffee Bean.
Mist again lightly with water, then add Coffee Bean starting around the edges for a smokey aged look, you can make it as dark as you want by adding more.
With a clean brush, come back around and blend it once more, using the pouncing and swirling until you get the look you want.
Mist a little water if it starts to dry out and keep blending until you’re happy.

Let it dry over night for 24 hours or more before sealing.
If you’re not happy with the color, guess what, you can just paint over it!
Step #3 Using Spray Wax to Seal Chalk Mineral Paint
I seal it using Dixie Belle’s Easy Peasy Spray Wax, which is pretty EASY to use.
Just shake it up, spray it on, and smooth it out.
I used a Dixie Belle Applicator Pad, which are reusable terry cloth and perfect for this application.

The wax will be dry to the touch in 30 minutes, and cures in 6 hours.
If it’s a piece of furniture you’ll be using often, such as a chair, you may notice areas where the wax sheen is wearing down.
This is ok, you can just reapply when you need to refresh it. Easy Peasy!
I hope you enjoyed this tutorial, and it inspires you to give this a try on those Thrift Store & Flea Market Finds. Maybe now you’ll see something that you can customize or flip!
My Video Tutorial, plus all the Products & Links for what I used are listed below.
Here’s the link for my Youtube Video Tutorial :
Products & Links for this project:
Dixie Belle’s White Lightning White Lightning Cleaner – Furniture/Cabinet Chalk Paint | Dixie Belle Paint Company™
Dixie Belle’s Chalk Mineral Paint in Chocolate, Pine Cone, Sand Bar, Muscadine Wine & Coffee Bean
Dixie Belle’s Easy Peasy Spray Wax Waxes, Glazes and Finishes – Waxes – Spray Wax – Dixie Belle Paint Company


Comments